How to Make a Flowchart in PowerPoint, With an AI Alternative
Draw a flowchart in PowerPoint with shapes and connectors, or create a modern branded version with AI in Moda. Compare both designs and download the PPTX files.
 Anvisha Pai, Co-founder & CEO, Moda
PowerPoint gives you the shapes and connectors to draw a flowchart. You still need to decide how it should look: which steps deserve emphasis, where the decision branches go, and how the diagram fits the rest of your deck.
Here are two ways to build the same content-approval workflow: draw it in PowerPoint, or describe it to Moda and export a more modern, branded slide. Compare the finished designs below, then jump to the method you prefer. We’ll also add a step to the process and check the PowerPoint handoff.
The native steps were tested in PowerPoint for Mac 16.112.4. Windows menus may differ. Both opening screenshots show the final workflow, including the added legal-review step.
Two ways to design your flowchart
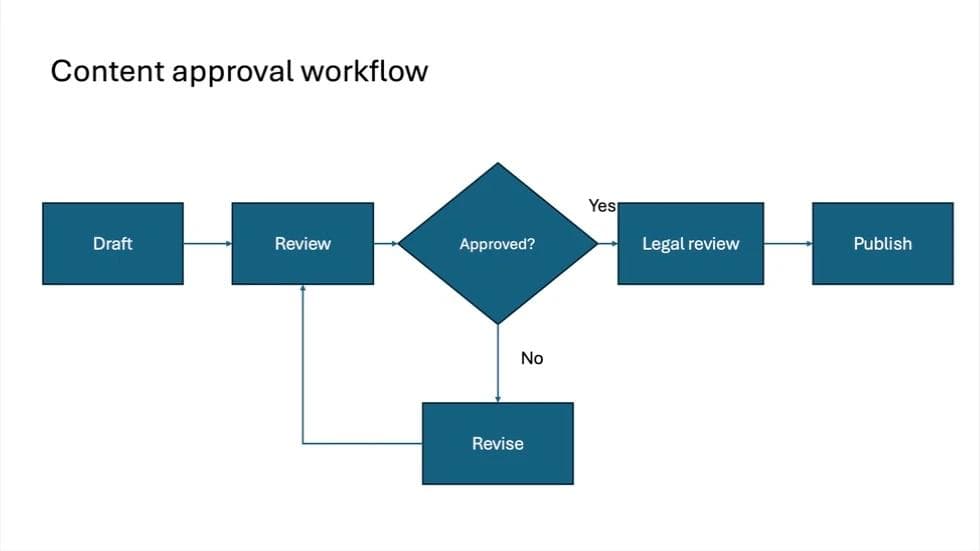
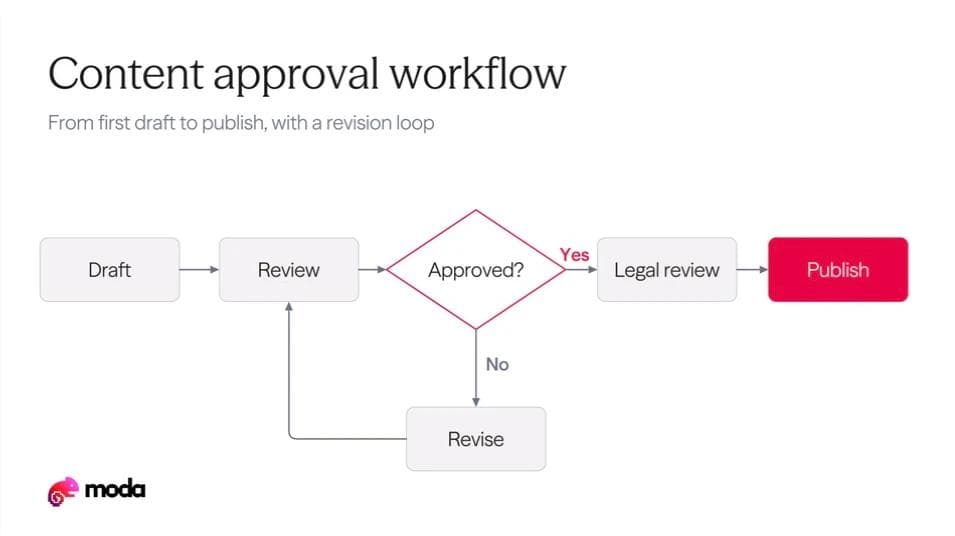
Build it in PowerPoint · Create it with AI in Moda
Download the native PowerPoint example or the Moda-created PowerPoint example. The native file contains the original and revised slides. The Moda file contains the final revised diagram shown above.
The native design uses matching filled process boxes, a larger decision diamond, and a clearly separated revision loop. It is a practical diagram built entirely with PowerPoint’s drawing tools.
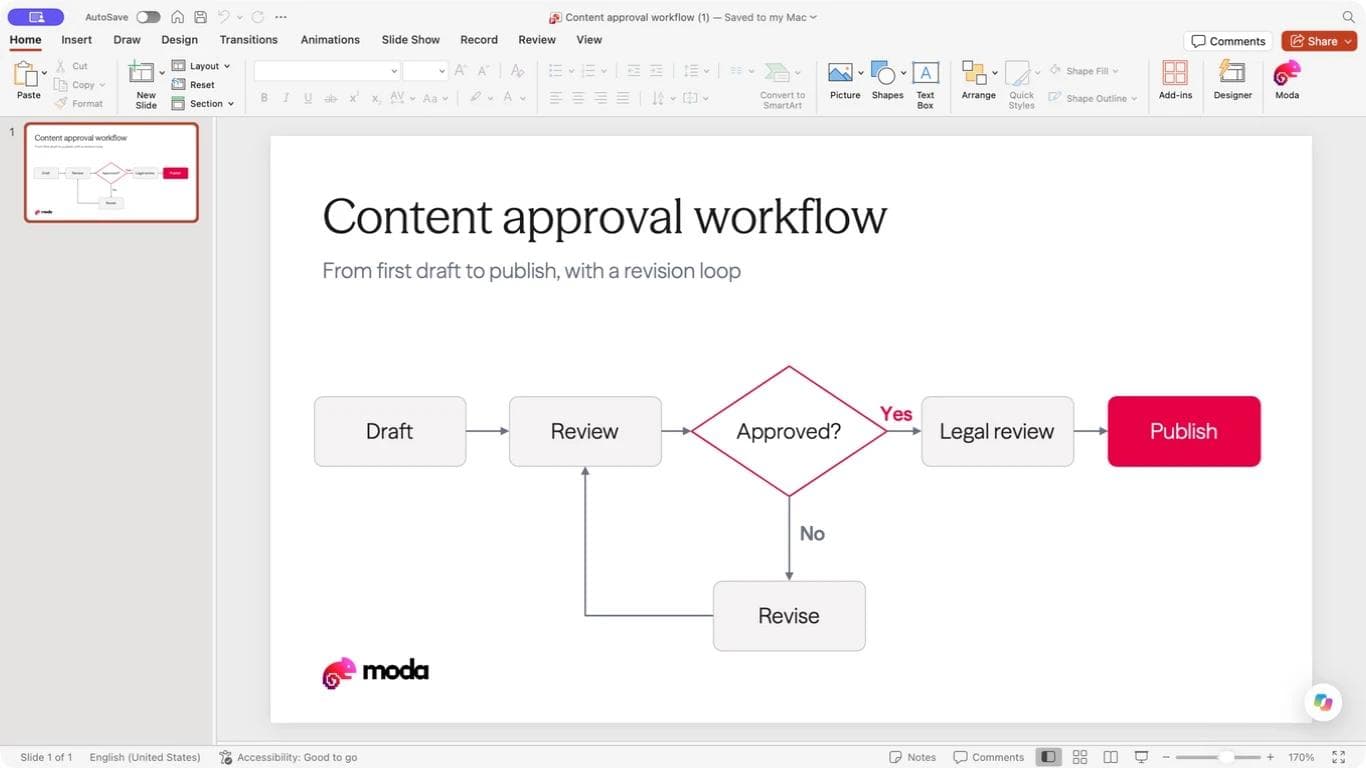
The Moda version uses lighter shapes, an outlined decision, a larger display title, and a brand accent on the final Publish step. That gives the slide a clearer visual hierarchy and makes the outcome stand out. For a presentation that needs a more modern, branded style, it is the stronger starting point of these two examples.
PowerPoint can be styled this way too. The difference is whether you want to arrange and format each element yourself or give the layout work to an AI design tool and refine its result.
The workflow we’ll draw
Start with the process in words. Our fictional example has four actions and one decision:
Draft -> Review -> Approved?
Yes -> Publish
No -> Revise -> Review
The return to Review matters. A rejected draft goes through another review after revision. It does not restart at Draft or bypass approval on its way to Publish.
We’ll build that version first, then add Legal review between the Yes branch and Publish. The opening screenshots show the revised version so you can compare equivalent results.
Build the flowchart in PowerPoint
1. Add the process boxes
Start with a new slide and choose Home > Layout > Blank.
Open Insert > Shapes. In the Mac version we used, the same Shapes gallery was also available on the Home ribbon. Under Flowchart, choose Process, then drag to draw a rectangle. With the shape selected, type Draft.
Repeat for Review, Publish, and Revise. Use similar widths and heights for the process boxes so they read as the same kind of step. Put Draft and Review on the main row, Publish toward the right, and Revise below the decision area.
For this example, we use Shapes rather than SmartArt because we want direct control over a decision branch and a return loop. SmartArt's Process layouts can be useful for a simpler sequence. Microsoft documents both routes in its PowerPoint flowchart guide.
2. Insert the decision diamond
Return to Shapes > Flowchart and choose Decision. Draw the diamond between Review and Publish, then type Approved?.
Give the label enough room. Our initial diamond split “Approved?” across two lines in the middle of the word. Widening the diamond fixed the break. We used 16-point type inside the diamond and 18-point labels in the process boxes.
Those sizes worked in this example, not every room or slide. Check the finished diagram at presentation size and enlarge the shapes if the labels are difficult to read.
3. Arrange the main path before connecting it
Put the centers of Draft, Review, the decision diamond, and Publish on one horizontal line. Compare their centers rather than their top edges, since the diamond is taller than the process boxes.
Keep Revise below the diamond, with open space to its left for the return path. Leave enough space above the diagram for a title. We added Content approval workflow as a separate 32-point text box.
The main path should be obvious before the arrows are added. If a reader has to search for the next step, rearrange the boxes before styling them.
4. Draw attached arrows between the shapes
Open Shapes > Lines and choose Arrow. Draw from a connection point on the first shape to a connection point on the second:
- Draft to Review.
- Review to Approved?.
- Approved? to Publish.
- Approved? down to Revise.
A line touching a box is not necessarily attached to it. Look for the connection points as you draw and finish on the destination shape's point. Microsoft's connector instructions explain how attached endpoints follow shapes when they move.
Test one connection before drawing the rest: move a process box a little. In our native file, moving Review upward moved the two arrows on either side and the return connector with it. We undid the move after checking.
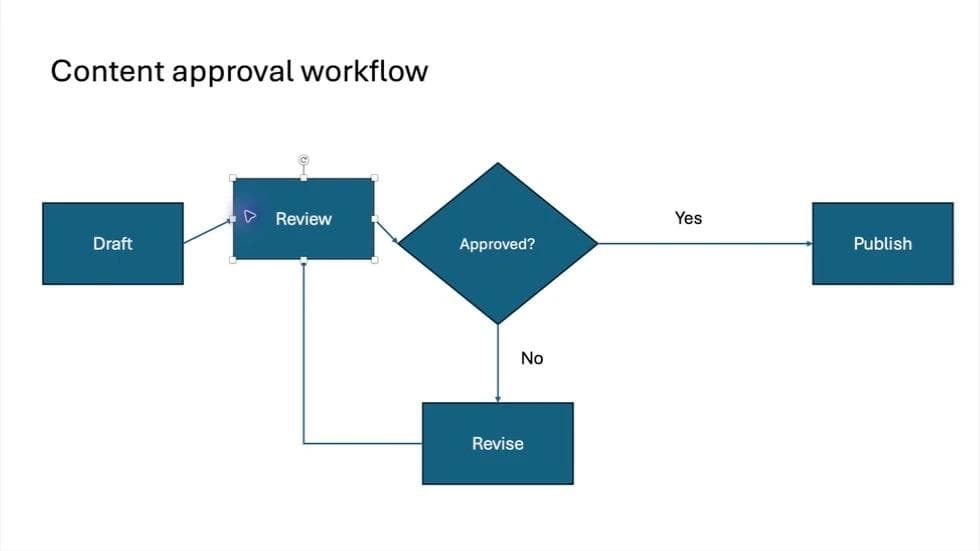
If an endpoint stays behind, reconnect it to the shape rather than simply making the line look aligned again.
5. Add the return loop and branch labels
For Revise -> Review, choose Elbow Arrow Connector from the Lines section. Draw from the left side of Revise to the bottom of Review. Our connector runs left, turns upward, and ends with an arrow at Review.
Use separate text boxes for Yes beside the path to Publish and No beside the path to Revise. Place each label next to its outgoing branch, with enough space that it does not touch a box or arrow.
Follow both routes with your eye. The direction should be clear even without a presenter explaining it. The arrows, not just the placement of the boxes, establish the sequence.
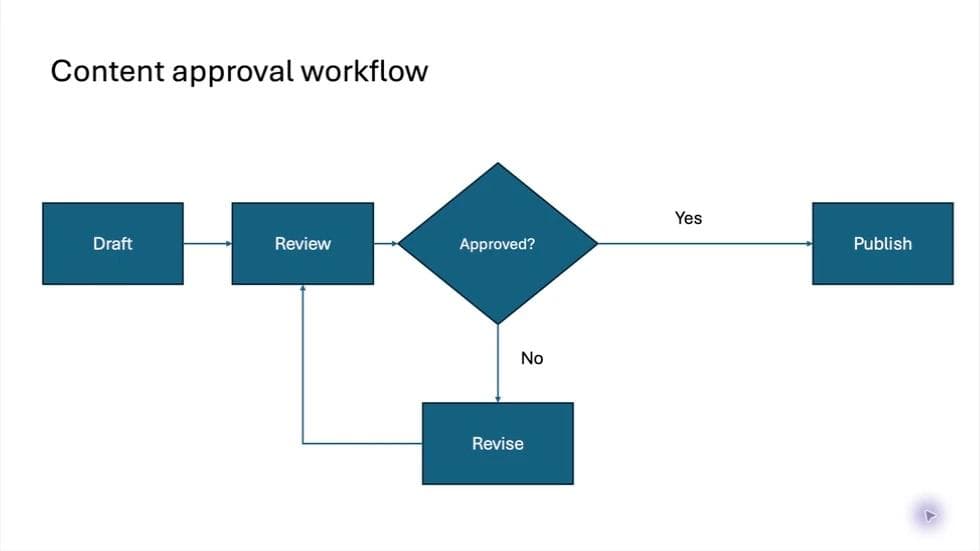
6. Make the styling consistent
We kept the native example restrained: one fill color for the process boxes and decision, white labels, thin arrows, and a larger black heading.
To change that treatment, select the relevant elements and use PowerPoint’s Shape Fill, Shape Outline, and text-formatting controls. Keep equivalent steps consistent, then use an accent only where it explains something, such as the final outcome.
Avoid making every box compete for attention with a different color or effect. If you want help choosing type that will work when the deck is shared, see our presentation font guide.
Add a step without breaking the flow
To add Legal review before publishing, duplicate the original slide first. That gives you a before-and-after version and preserves the starting example.
On the duplicate:
- Select and delete the direct arrow from Approved? to Publish.
- Insert a Process rectangle labeled Legal review between them.
- Draw a new attached arrow from Approved? to Legal review.
- Draw another from Legal review to Publish.
- Move the Yes label beside the first of those arrows.
- Check that the No branch still goes to Revise and returns to Review.
Do not place a new box over the old arrow and assume the connection has been updated. Replacing the connector makes the revised path explicit and leaves fewer stray lines to fix later.
The useful check is simple: follow the approved path all the way to Publish, then follow the rejection loop back to Review. Every arrow should serve one of those routes.
Create a more modern flowchart with AI in Moda
In a new Moda task, select Slides and your brand kit. Supply the exact process, including where each decision branch goes, and describe the design you want.
This was our complete prompt:
Create one editable 16:9 presentation slide titled "Content approval
workflow" using the selected Moda brand kit. This is a fictional
workflow for a PowerPoint tutorial.

Show exactly this logic:
Draft -> Review -> Approved?
Approved? has two labeled outgoing paths:
Yes -> Publish
No -> Revise -> Review

Use process boxes for Draft, Review, Revise, and Publish, and a
decision diamond for Approved?. Make arrow directions and Yes/No
labels unambiguous. The revision loop must return to Review, not
Draft or Publish.

Design a modern branded slide with a strong title, light shapes,
restrained accent color, readable typography, and thin connectors.
Avoid heavy shadows and decorative imagery. Keep labels concise and
preserve the exact wording above. Leave enough room to insert one
extra step on the Yes path later. No extra decisions, steps, images,
or slides. Keep text, shapes, and lines editable. We will export it
as PPTX and continue editing in PowerPoint.
The first design used light process boxes, a thin outlined diamond, and a bright brand accent for Publish. It kept the Yes and No routes clear and returned Revise to Review.
We then added the same legal-review step with this follow-up:
Insert one process box labeled "Legal review" on the Yes path
between Approved? and Publish. The final logic must be Draft ->
Review -> Approved?; Yes -> Legal review -> Publish; No -> Revise ->
Review. Keep the same slide, title, typography, brand treatment, and
existing labels. Adjust spacing only as needed so every label and
arrow is readable. Do not add another decision, invent legal policy,
change the No loop, or add a slide. Keep all text and drawing
elements editable for PowerPoint.
Moda inserted Legal review on the Yes path and adjusted the horizontal spacing. The No loop stayed connected to Review. The PowerPoint export needed one further repair, described below.
Review the logic as well as the appearance. A good-looking diamond with an unlabeled branch is still an incomplete explanation of the process. Keep the decision wording and both outcomes explicit in your prompt.
Export and check the PowerPoint file
In Moda, open Export, choose PowerPoint, and click Download. Open the actual PPTX and inspect the entire diagram.
Our first export revealed a problem: the diamond was present, but its “Approved?” label was missing. We asked Moda to make that label a separate editable text element above the diamond, then exported again. The corrected file showed the label properly in PowerPoint. The download above is that corrected version.
We also changed Review to “Editor review” inside PowerPoint and confirmed that the text was editable. Moving the box revealed a maintenance difference: the exported lines stayed at their old positions. We undid both test edits. For structural changes to this exported example, revise in Moda and export again, or reconnect the lines in PowerPoint. Do not assume editable drawing elements retain the native connector behavior shown earlier.
The final file was checked in PowerPoint presentation view with every label visible and both decision paths intact. Check fonts and layout on the recipient’s computer too.
Choose the native route when you want to build and maintain the diagram in PowerPoint. Choose Moda when you want help designing a branded first draft and prefer to revise the source through a prompt. In either case, inspect the version the next person will actually receive. Our PowerPoint export guide covers the broader handoff checks.
PowerPoint flowchart questions
Can I make a flowchart in PowerPoint without an add-in?
Yes. Use the Process and Decision shapes from the Shapes gallery, then connect them with arrows from the Lines section. This tutorial's native example uses PowerPoint's built-in tools.
Can I use SmartArt for a flowchart?
SmartArt includes Process layouts that can help with a simple sequence. We used individual shapes for this example to control the Yes/No decision and the return loop directly.
Why do my arrows stay behind when I move a box?
The endpoint may not be attached to a connection point on the shape. Reattach it and move the box slightly to test. In our native example, correctly attached arrows moved with the Review box.

Real editable visuals. Real canvas. Full control.
Fly through design work