How to Make a Timeline in PowerPoint, With an AI Alternative
Build a PowerPoint timeline with SmartArt, add milestones, fix crowded labels, and customize the spacing. Includes real screenshots and editable examples.
 Anvisha Pai, Co-founder & CEO, Moda
A timeline should make your plan clear and look like it belongs in your presentation. PowerPoint’s SmartArt can turn a list of dates into a usable diagram, but its default styling may not be what you want in a client or leadership deck.
This guide shows you how to build and customize a timeline in PowerPoint, then how to get a more modern, branded design by creating it in Moda and exporting it to PowerPoint. We’ll use the same launch schedule for both, show the results, and test how they handle edits. You can download the finished PowerPoint files and choose the approach that fits your deck.
We built the examples below in PowerPoint for Mac 16.112.4, then added a milestone and customized a separate copy. The screenshots show that version. Windows uses some different menu names, noted where relevant.
Two ways to design your timeline
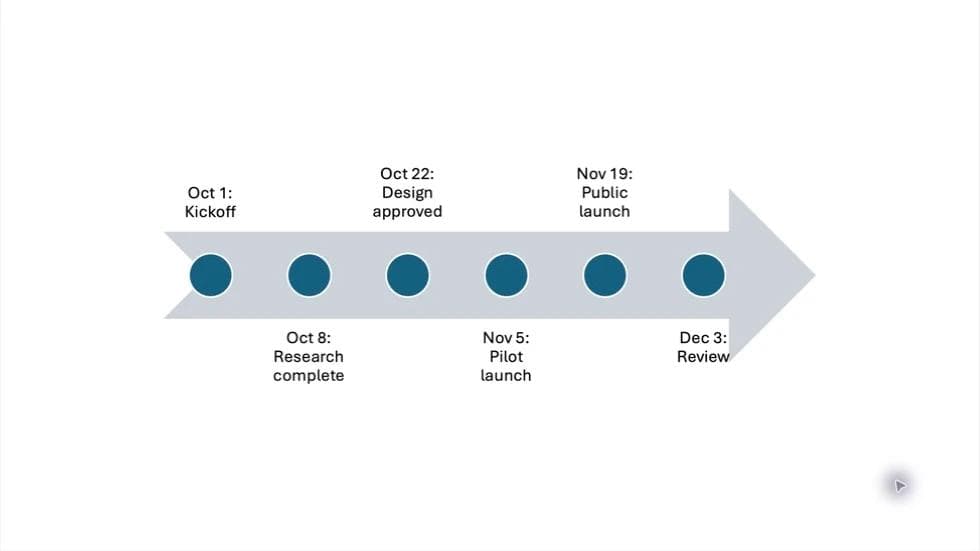
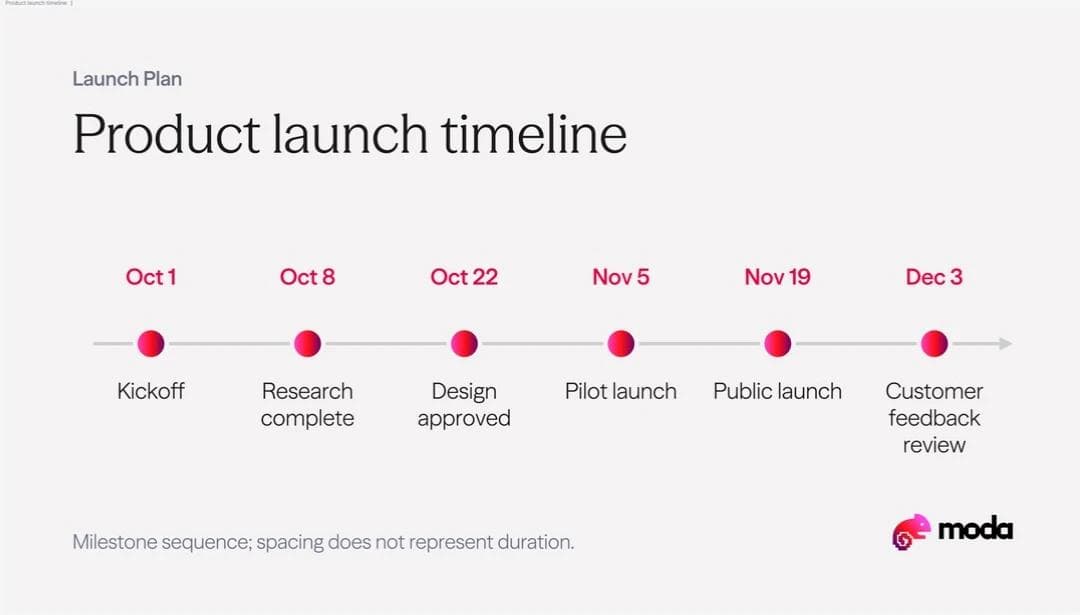
Build it in PowerPoint · Create it with AI in Moda
Download the five-milestone SmartArt example or the two-slide file with SmartArt and custom-spacing versions.
The launch timeline we’ll build
For this fictional product launch, the slide needs five milestones:
| Date | Milestone |
|---|---|
| Oct 1 | Kickoff |
| Oct 8 | Research complete |
| Oct 22 | Design approved |
| Nov 5 | Pilot launch |
| Nov 19 | Public launch |
The design difference is visible in the examples above. SmartArt puts the milestones on a thick gray arrow, with labels alternating above and below it. The Moda version uses a thin line, smaller accent markers, a prominent title, and coordinated brand typography. For a customer-facing presentation, the Moda version is the cleaner starting point. SmartArt remains useful when you need a quick diagram that automatically rearranges its milestones.
Before building, decide which job your slide has:
| What the audience needs | Starting point |
|---|---|
| The order of a few milestones | Basic Timeline SmartArt |
| A branded first draft from a written brief | Create the slide in Moda, then check its PowerPoint export |
| Custom spacing or independently positioned labels | A copy converted to PowerPoint shapes |
Keep the slide focused on the decisions the meeting needs. Put the full project plan elsewhere if it contains owners, dependencies, and dozens of dates. A timeline slide is a summary of that plan.
Make a timeline with SmartArt
1. Start with a blank slide
Create a slide, then choose Home > Layout > Blank. This avoids placing the timeline over empty title or content placeholders. You can add a separate title once the graphic fits.
If you are working inside a company presentation, start in that file so the slide uses its theme. Save a working copy before experimenting with an important deck.
2. Insert Basic Timeline
In the Mac version we tested, choose Insert > SmartArt > Timeline > Basic Timeline.
Microsoft's general PowerPoint instructions use Insert > SmartArt > Process, then a timeline layout. If your gallery does not have a Timeline category, look under Process. Both Basic Timeline and Circle Accent Timeline are documented options. Microsoft's timeline instructions
Start with Basic Timeline for these labels. We also tried Circle Accent Timeline: it retained the milestones, but displayed the labels diagonally. That was a poor fit for the longer event names in this example.
3. Enter one milestone per bullet
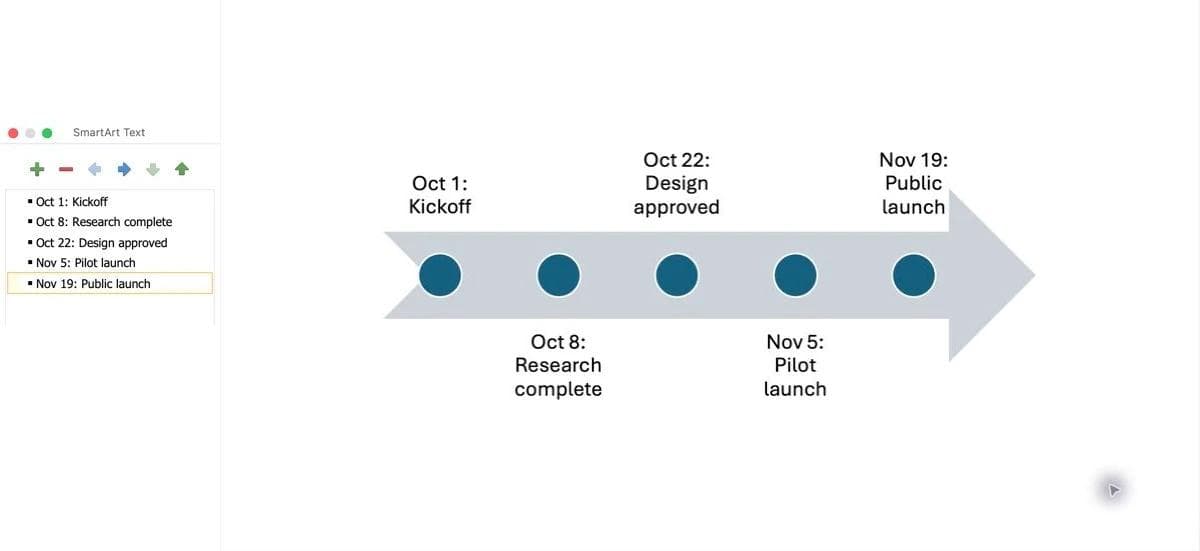
Select the graphic and choose SmartArt Design > Text Pane. On our Mac, this opened a separate window titled SmartArt Text.
Replace the placeholder entries with your dates and labels. Keep every milestone at the same bullet level. Press Return to create the next item; do not indent it with Tab.
Oct 1: Kickoff
Oct 8: Research complete
Oct 22: Design approved
Nov 5: Pilot launch
Nov 19: Public launch
Watch the bullets while entering the text. Each milestone needs its own bullet, not merely a new line inside the same bullet. In our test, pasting a multiline block produced one marker with several lines of text. Entering the items with Return created five separate markers.
Close the Text Pane and check the graphic. All five dates should be visible, in chronological order, with each label attached to the correct marker.
4. Check the layout at presentation size
The Basic Timeline alternates labels above and below the arrow. In our five-item example, the longer names wrapped onto multiple lines while remaining readable.
Move or resize the whole graphic using its outer selection border. Clicking inside a label edits that label; it is not the same as selecting the full SmartArt object.
Leave room for a clear title and give the timeline a consistent type treatment. The default arrow is visually dominant. If it competes with your content or clashes with the rest of the deck, try a different SmartArt layout or use the custom-design route below.
Use your deck's normal typeface. If the timeline is hard to read, simplify the labels or give the graphic more room before shrinking the text. Our guide to fonts for presentations covers readability and what happens when a deck is sent to another computer.
Add, reorder, and restyle milestones
Add another event
Reopen the Text Pane, put the cursor at the end of the last item, and press Return. Type the new date and label.
We added “Dec 3: Customer feedback review.” PowerPoint automatically redistributed the six markers across the same graphic. The new label wrapped to four lines, making the bottom of the slide visibly busier.
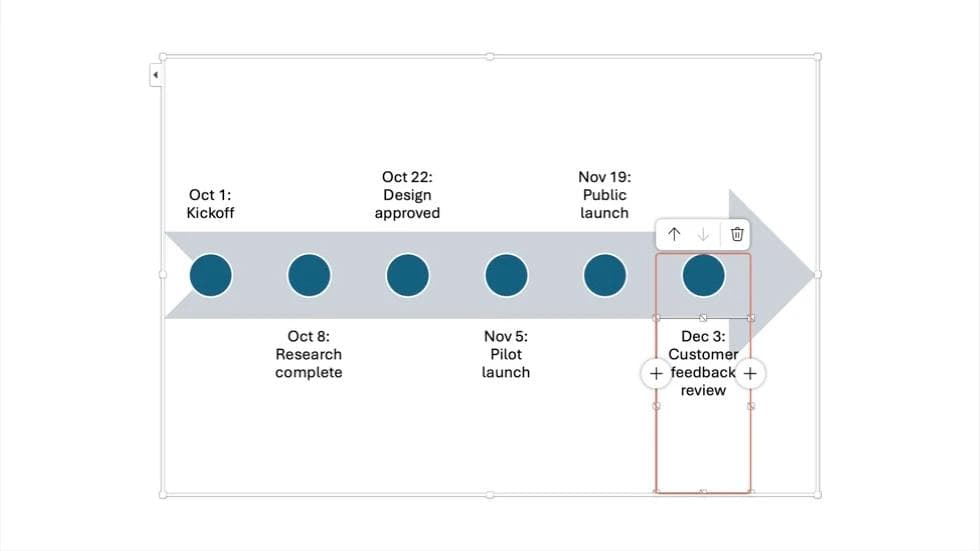
A practical fix was to shorten the slide label to “Dec 3: Review.” Keep the full wording in your notes or project plan if the audience needs it. Shortening a label is appropriate only when its meaning remains clear in the meeting.
You can also insert a milestone using SmartArt Design > Add Shape. Microsoft's instructions distinguish Add Shape Before and Add Shape After so you can insert an event in the middle of the sequence. Adding dates in SmartArt
Change the order
Edit the list order, not just the date text. Changing “Nov 19” to “Oct 15” does not mean the graphic understands that the event belongs earlier.
Our Mac ribbon has Move Before and Move After controls; Microsoft's general instructions call the corresponding controls Move Up and Move Down. Confirm the visible sequence after reordering.
Change colors or layout
With the timeline selected, open SmartArt Design. Use Change Colors for a coordinated color treatment, or choose another layout from the gallery.
A different layout can change text direction, available label space, and the prominence of the markers. Inspect the whole slide after switching. A layout that works for one-word stages may be awkward for dated milestones.
Customize the timeline with ordinary PowerPoint shapes
Convert a copy to ordinary shapes when you want more control over the design than the SmartArt layout gives you. You can adjust individual markers and label boxes instead of accepting the preset arrangement.
Our example changes the marker positions to demonstrate that control. Conversion itself does not redesign the slide: the gray arrow and other default styling remain until you change them.
1. Duplicate the slide first
Select the slide thumbnail and duplicate it. On Mac, Command+D duplicated the selected slide in our test.
Keep the original SmartArt slide. It remains the convenient version for editing the milestone list and adding events automatically.
2. Convert the copy to shapes
Select the SmartArt graphic on the duplicate. Choose SmartArt Design > Convert > Convert to Shapes.
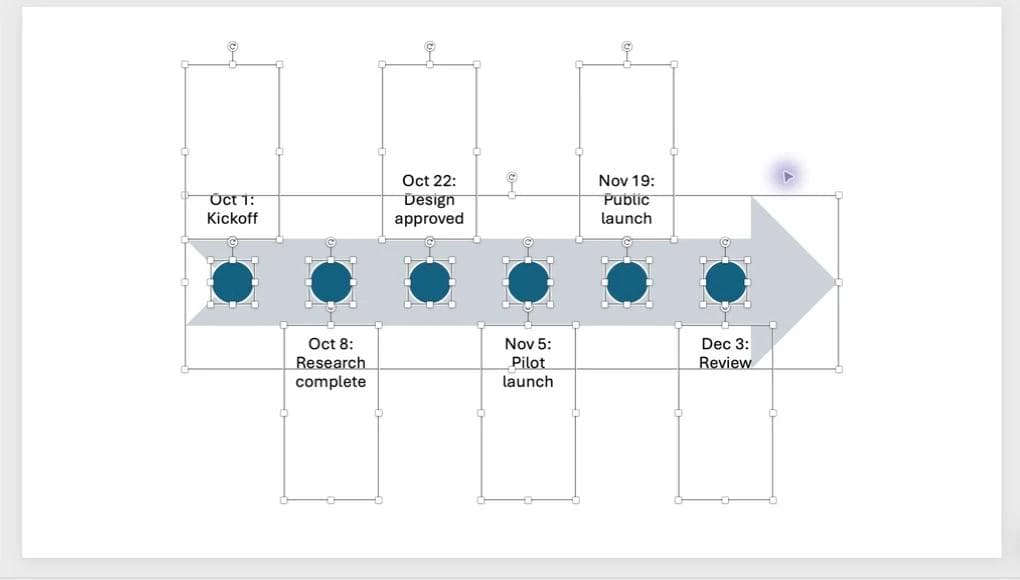
Then choose Home > Arrange > Ungroup. In our example, this exposed the arrow, circles, and label boxes as independently selectable objects. The SmartArt Design tab was replaced by ordinary shape-formatting controls.
3. Move each marker with its label
Adjust the marker positions, then realign their labels. Moving a circle alone does not move the separate text box with it.
We moved the intermediate circles and label boxes to make the first gap roughly half the later gaps. This was a manually positioned illustration, not a calculation-driven chart. It demonstrates the control you gain, and the work you take on, after conversion.
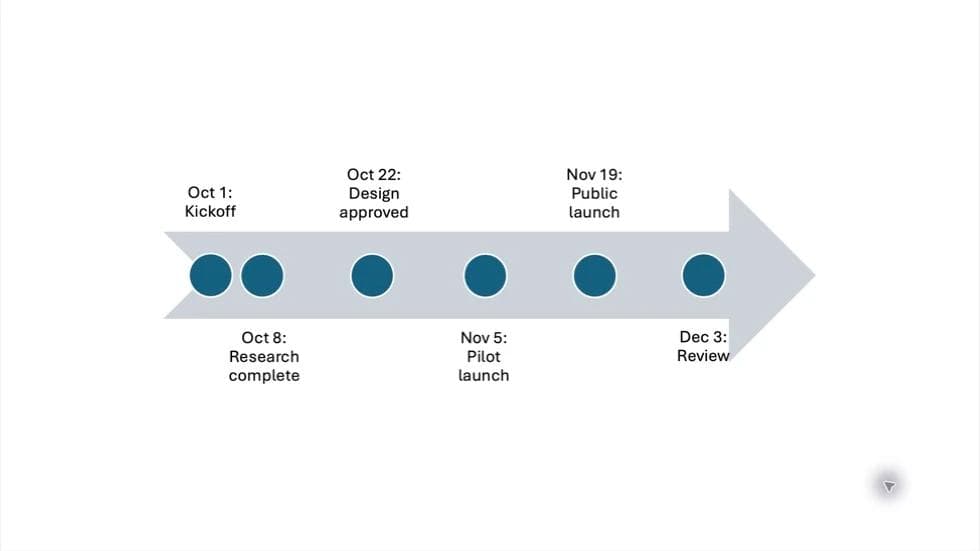
One practical note: Basic Timeline spaces milestones evenly, regardless of the dates. If the gaps need to represent elapsed time, use a date-scaled chart rather than treating the SmartArt positions as a calendar.
4. Keep the right version for the next edit
The converted copy is still editable, but it no longer behaves like the original SmartArt diagram. Adding another label will not automatically create and space another marker.
Use the SmartArt original when the milestone list changes. Use the shapes copy when the layout needs a deliberate, local adjustment. Keep both if another person will maintain the deck.
Create a more modern timeline with AI in Moda
If you want a branded slide built from a brief, rather than arranging the graphic yourself, you can make the first draft in Moda and export it to PowerPoint.
We used the same five milestones, selected the Moda brand kit, and chose Slides in a new task. This was the complete prompt:
Create one editable 16:9 PowerPoint-ready slide titled "Product launch timeline" using the selected Moda brand kit. This is a fictional example for a tutorial.

Show these five milestones in chronological order, preserving every date and label exactly:
Oct 1: Kickoff
Oct 8: Research complete
Oct 22: Design approved
Nov 5: Pilot launch
Nov 19: Public launch

Use a simple horizontal milestone timeline with readable labels. This is a sequence overview, not a date-scaled chart: include the small note "Milestone sequence; spacing does not represent duration." Keep all text and markers editable. No photos, generated images, extra facts, extra slides, or unsupported claims. Leave enough space to add a sixth milestone later. The final handoff will be a PPTX opened and edited in PowerPoint.
The first result contained one slide with all five dates and labels, a branded title and logo, the spacing note, and room for another milestone. We then submitted this follow-up:
Add a sixth milestone at the right: Dec 3: Customer feedback review. Use the reserved space. Keep the existing five dates and labels, title, brand treatment, and spacing disclaimer unchanged. Keep the new date and label editable and readable. Do not add another slide.The sixth event appeared in the reserved space. Its full label wrapped onto three lines; the earlier milestones and the spacing note remained in place. No corrective prompt was needed for this example.
To download it, open Export, choose PowerPoint, and click Download. We opened that PPTX in PowerPoint on the same Mac and checked the complete slide in presentation view. We also changed the last label to “Customer review” and moved its circle independently, then undid both test edits.
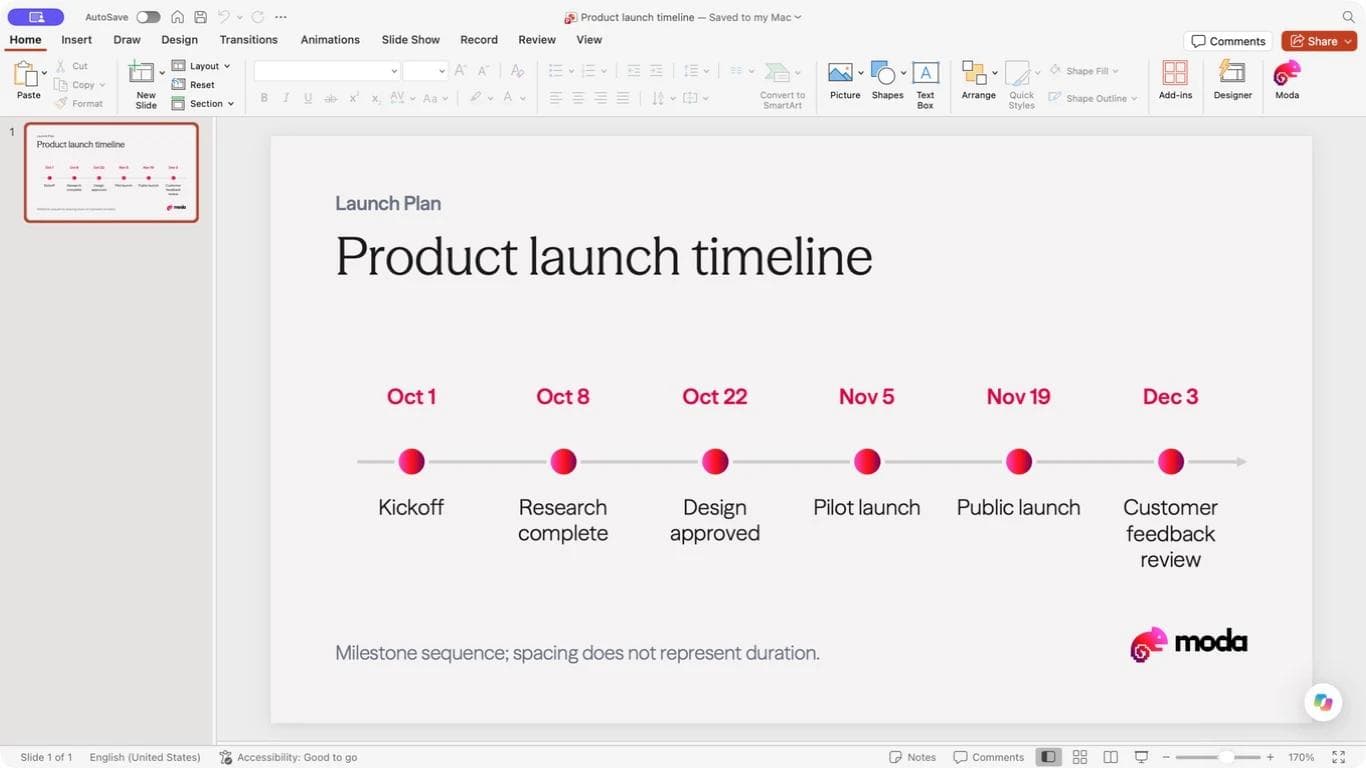
Download the Moda-created PowerPoint example to inspect the result yourself.
Choose Moda when you want a more modern, branded starting point without building the layout by hand. In this example, the finer timeline, stronger title hierarchy, and coordinated colors and typography make the biggest difference. Choose SmartArt when a simple diagram and automatic milestone updates are enough. The Moda export stays editable, but it is not SmartArt, so PowerPoint will not automatically rearrange it when you add an event.
Check the file before sending it
Open the saved PPTX in PowerPoint and check it in Slide Show view, not only at a comfortable editing zoom.
- Read every date and label in order.
- Check that the typography, colors, and overall style fit the rest of your presentation.
- Check that added events have not made the text too small.
- Select a label and confirm it can still be edited.
- Keep the SmartArt source if the recipient needs automatic milestone updates.
For slides created outside PowerPoint, also check the fonts, line breaks, and individual editable elements after export. Our PowerPoint export guide explains those handoff checks in more detail.
PowerPoint timeline questions
Does PowerPoint have a timeline template?
PowerPoint includes timeline SmartArt layouts. In the Mac version tested here, Basic Timeline is under Insert > SmartArt > Timeline. Microsoft's general instructions place it under Process. A SmartArt layout is a diagram you insert into your slide, rather than a complete presentation template.
Why are all my dates showing under one marker?
Check the SmartArt Text Pane. Each milestone needs its own bullet. Multiple lines within one bullet can remain one marker. Enter the first milestone, press Return for the next bullet, and continue.
Does SmartArt space the markers according to the dates?
In the Basic Timeline we tested, no. The milestones were spaced evenly even though the first interval was seven days and the following intervals were fourteen. Treat it as an ordered sequence unless you deliberately build a date-scaled version.
Can I edit the timeline after converting it to shapes?
Yes. You can edit the text and position individual shapes. You lose the SmartArt layout behavior, so new milestones need manual construction and placement. Duplicate the slide before converting so you retain the SmartArt version.

Real editable visuals. Real canvas. Full control.
Fly through design work